
Anime Nexus RNG Defend Guide: Debuffs and Rewards
Defend puts your team around Fuyuki City's central crystal while enemies attack from four corners. Choose Normal or Nightmare, add debuffs for more Fate Capsules, and keep the crystal alive through the final boss.
Open Play → Custom → Defend → Open, choose a difficulty and debuffs, then press Start. Clearing a wave starts the next immediately; otherwise, waves arrive every 30 seconds before timing debuffs. Win for Fate Capsules and one Gate of Babylon. To resume after leaving, rejoin with the exact same debuff selection.
Entry and wave timing
- Open Play, select Custom, choose Defend, and press Open.
- Select Normal or Nightmare.
- Choose individual debuffs, use All Debuffs to select every modifier, or press Clear to remove your selections.
- Read the selected configuration's objective and reward preview, then press Start.
Protect the central crystal from enemies approaching from all four corners of Fuyuki City. Clearing every enemy in a wave starts the next wave immediately. If enemies remain, the next wave still arrives on a timer: 30 seconds without a timing debuff, 24 seconds with Relentless, or 18 seconds with Overrun.
Unfinished waves overlap with incoming enemies. Spread your coverage across the approaches and prioritize enemies getting close to the crystal rather than leaving one side undefended. Long Siege changes the survival requirement by adding 10 waves.
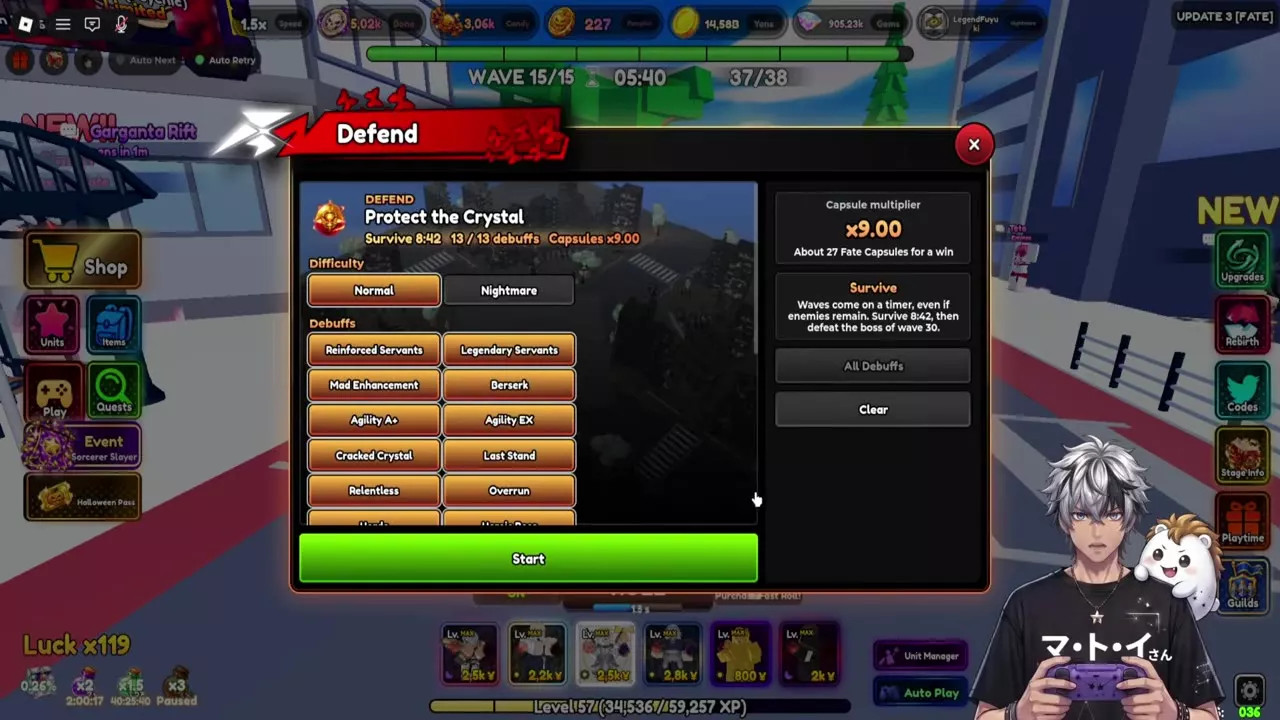
Debuff effects
Each selected debuff increases the challenge and Fate Capsule rewards. Choose modifiers around the pressure your team can handle, then check the combined capsule multiplier before starting.
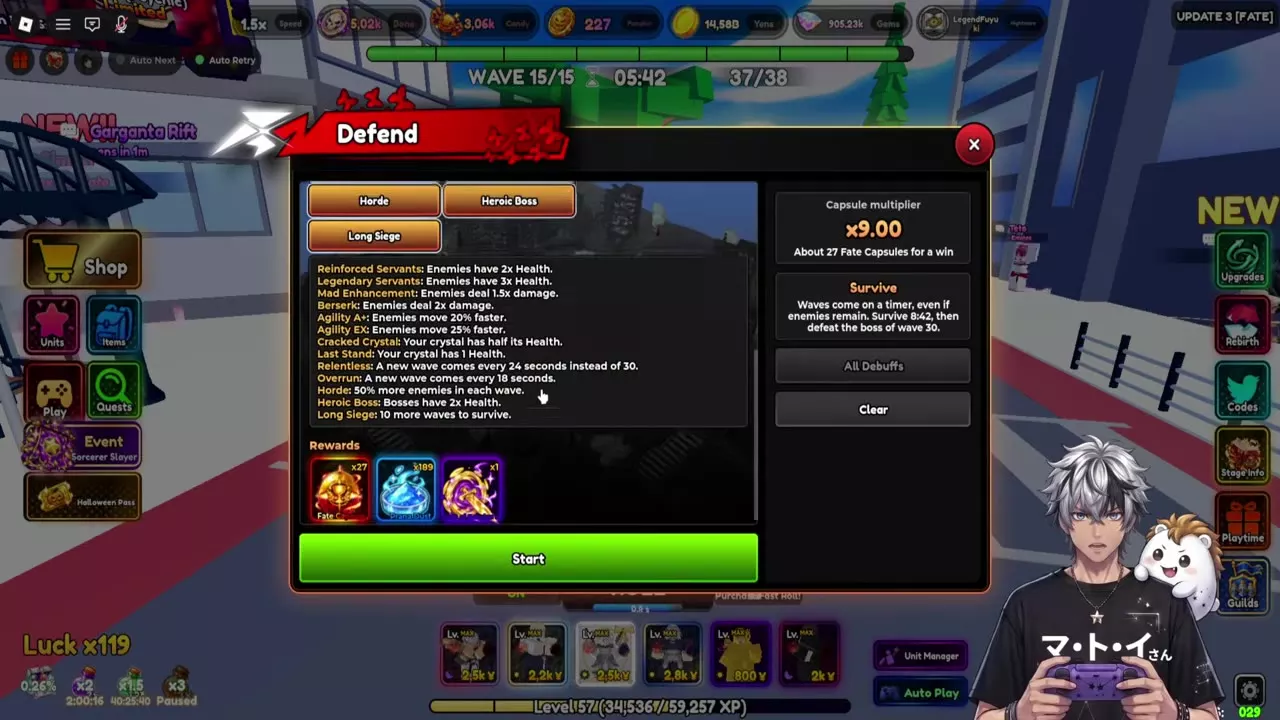
| Debuff | Effect | Requirement or extra reward |
|---|---|---|
| Reinforced Servants | Enemy health ×2 | — |
| Legendary Servants | Enemy health ×3 | — |
| Mad Enhancement | Enemy damage ×1.5 | — |
| Berserk | Enemy damage ×2 | — |
| Agility A+ | Enemy movement speed +20% | — |
| Agility EX | Additional movement speed +25% | Agility A+; Fate Capsules +50% |
| Cracked Crystal | Crystal health halved | — |
| Last Stand | Crystal health: 1 | — |
| Relentless | Timed waves: 24 seconds | — |
| Overrun | Timed waves: 18 seconds | — |
| Horde | Enemies per wave +50% | — |
| Heroic Boss | Boss health ×2 | — |
| Long Siege | Survival requirement +10 waves | — |
Enable Agility A+ before Agility EX. EX adds its movement-speed increase on top of Agility A+ and grants 50% more Fate Capsules for the run.
Choose modifiers for your team
- Enemies accumulating between waves: leave health increases, Horde, and shorter wave intervals off until your damage can clear the buildup. These modifiers increase the work your team must finish before more enemies arrive.
- Fast enemies reaching the crystal: remove movement-speed modifiers first. Agility EX adds a capsule bonus, but it also shortens your interception window.
- Occasional leaks: keep Last Stand off. A crystal with 1 health leaves no room for an enemy hit; Cracked Crystal also reduces your margin for mistakes.
- A slow final boss kill: leave Heroic Boss off while improving boss damage. Doubling boss health extends the final fight.
- Short farming sessions: leave Long Siege off to avoid its additional 10-wave requirement.
Tap or hover modifier cards in Stage Info to read their effects and counterplay.
Normal
Set up and defend
- Select Normal. For a first clear, press Clear and start without debuffs so you can establish coverage before adding extra pressure.
- Press Start and deploy damage to cover all four approaches to the central crystal.
- Upgrade your damage as the run advances. If enemies survive into the next wave, focus on clearing the backlog before it reaches the crystal.
- Keep the crystal alive through the selected survival objective and defeat the final boss to win.
For repeat farming, add debuffs that your team can finish reliably. A higher capsule preview is useful only when you complete the run; remove the modifier causing leaks or an unmanageable enemy buildup.
All-debuff Normal configuration
With all 13 debuffs enabled on Normal, the setup lists a survival objective of 8:42, followed by defeating the Wave 30 boss. The reward preview below applies to that configuration, including its approximate win rewards.
The survival objective is not a fixed completion time: clearing a wave advances the run immediately, while surviving enemies overlap with timed reinforcements. Use this configuration as a progression target once your defense handles its combined health, speed, enemy-count, and crystal restrictions.
Defend
- Capsule multiplier
- 9× (Normal difficulty with all 13 debuffs selected.)
- Fate Capsule reward
- 27 capsules (Normal difficulty with all 13 debuffs selected; win the run.) Approximately 27 Fate Capsules in this configuration's reward preview.
- Prana Dust reward
- 189 Prana Dust (Normal difficulty with all 13 debuffs selected; win the run.) Approximately 189 Prana Dust in this configuration's reward preview.
Nightmare
Select the difficulty
Choose Nightmare in the same Defend setup window before pressing Start. Difficulty and debuffs are separate selections: use individual modifiers, All Debuffs, or Clear, then read the objective and win rewards for your Nightmare configuration.
Build up the challenge
Start Nightmare with fewer debuffs than your established Normal setup so you can assess the difficulty change before adding modifier pressure. Keep coverage on all four approaches, clear enemies before timed reinforcements pile up, and defeat the final boss while protecting the crystal.
The debuff effects listed above also govern your Nightmare selections, including Agility EX's Agility A+ prerequisite. Add modifiers as your team gains enough damage and interception coverage to complete the run.
Victory and resume
Victory rewards
Every Defend victory grants one Gate of Babylon, alongside the Fate Capsule rewards for your selected configuration. If the crystal is destroyed, the failed run awards no Fate Capsules. Choose a setup you can finish consistently when farming capsules.
Resume a saved wave
After leaving Defend, rejoin with the exact same debuff selection to return to the saved wave. Keep track of the enabled modifiers before leaving so you can match the configuration.
Starting with different debuffs does not resume the old run at its saved wave. Restore the original selection when your goal is to continue that run.
Fate progression routes
- Use your portal reward: continue through Gate of Babylon and the Secret Gate for portal progression and the key route.
- Work toward Clay Heart: the Enkido Special Quest includes Defend tasks, with a final Defend victory requiring Enkido in your team.
- Progress Sabar: Fate Capsules offer a route to Sabar, and Defend victories also contribute to her evolution requirements. Follow Sabar's evolution route for the required form and battle conditions.
- Open your rewards: check capsule rewards and bulk opening for Fate Capsule targets and the Items opening process.